How to Migrate E-mails from Outlook.com to Office 365 with IMAP

The tutorial depicts the step by step E-mail migration process from Outlook.com to office 365 using Internet Message Access Protocol (IMAP). To continue with the migration, it is essential to enable two-step verification using Microsoft Authenticator mobile app in a mobile device.


INTRODUCTION

What is IMAP migration?

This onboarding migration type migrates mailbox data from an IMAP server (including Exchange) to Microsoft 365 or Office 365. For an IMAP migration, you must provision mailboxes in Microsoft 365 or Office 365 before you can migrate mailbox data.

  • You can use the Internet Message Access Protocol (IMAP) to migrate user email from Gmail, Exchange, Outlook.com, and other email systems that support IMAP migration. When you migrate the user’s email by using IMAP migration, only the items in the users’ inbox or other mail folders are migrated. Contacts, calendar items, and tasks can’t be migrated with IMAP, but they can be by a user.
  • IMAP migration also doesn’t create mailboxes in Microsoft 365 or Office 365. You’ll have to create a mailbox for each user before you migrate their email.
  • After the email migration is done, any new mail sent to the source email isn’t migrated.[Source: Migrate email from another IMAP-enabled email system]

IMAP MIGRATION TECH ENCYCLOPEDIA MICROSOFT EXCHANGE O365

LIMITATIONS

  • You can only migrate items in a user’s inbox or other mail folders. This type of migration doesn’t migrate contacts, calendar items, or tasks.
  • You can migrate a maximum of 500,000 items from a user’s mailbox (emails are migrated from newest to oldest).
  • The biggest email you can migrate is 35 MB.
  • If you limited the connections to your source email system, it’s a good idea to increase them to improve migration performance. Common connection limits include client/server total connections, per-user connections, and IP address connections on either the server or the firewall.

[Source : What you need to know about migrating your IMAP mailboxes to Microsoft 365 or Office 365]

IMAP MIGRATION TECH ENCYCLOPEDIA MICROSOFT EXCHANGE O365

THE IMAP MIGRATION PROCESS

The 11 steps stated in Microsoft documentation can be followed to make the email migration process smooth and error free. However, in this tutorial, all the steps are not mentioned in detail.

[Source : What you need to know about migrating your IMAP mailboxes to Microsoft 365 or Office 365]

Process for an IMAP email migration

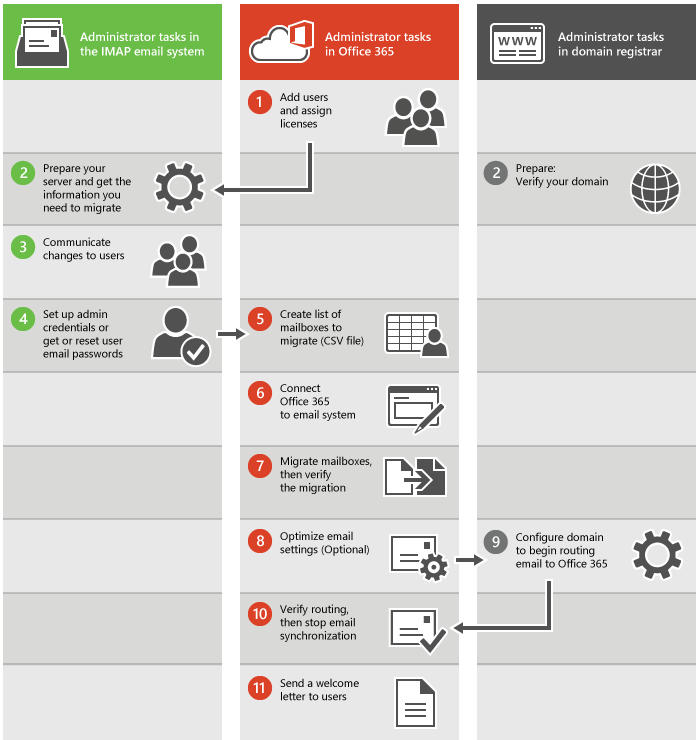
  1. First you have to create your users in Microsoft 365 or Office 365 and assign licenses to them. The mailboxes have to exist in Microsoft 365 or Office 365 to use IMAP migration.
  2. Prepare your IMAP source email system and get the information you need to migrate. If you plan to migrate your domain to Microsoft 365 or Office 365, verify that you own your domain with your domain registrar. Depending on which type of email service you are migrating from, you might need to configure some settings or simply record the name of your email server or service to use later. You also need to verify your domain in your domain registry system if you have a custom domain.
  3. Communicate changes to users. It’s a good idea to let users know about the email migration and how it impacts them. Give users information about what tasks need to be done before, during, and after migration.
  4. Set up admin credentials or get or reset user email passwords. To perform the migration, you need an administrator account that has permissions, or the username and password to each mailbox.
  5. If you are using the steps described in Migrate Google Apps mailboxes to Microsoft 365 or Office 365 or Migrate other types of IMAP mailboxes to Microsoft 365 or Office 365, you will create a list of mailboxes to migrate (CSV file). These migrations instructions start from the Exchange admin center, and you will need to create a CSV file that lists the email addresses, usernames, and passwords for the mailboxes you want to migrate. You can also use the migrations page or setup instructions in the Admin center preview to migrate from IMAP systems such as Gmail, Hotmail.com or Outlook.com. These steps are the best if you plan to migrate mail for only a few users (less than 50). If you are migrating mail for more users it is easier to use a CSV file to enter all the information for the accounts.
  6. Connect Microsoft 365 or Office 365 to the source email system. To migrate email successfully, Microsoft 365 or Office 365 needs to connect and communicate with the source email system. To do this, Microsoft 365 or Office 365 uses a migration endpoint, the settings that are used to create the connection.
  7. Migrate mailboxes and then verify the migration. To migrate mailboxes, you create a migration batch, and then start the migration. After the migration batch is run, verify that the email was migrated successfully.
  8. Optimize email settings (optional). There are some settings you can configure so that it doesn’t take as long for email to start showing up in your new Microsoft 365 or Office 365 mailboxes. See Tips for optimizing IMAP migrations.
  9. Begin routing email to Microsoft 365 or Office 365. You need to change a DNS record called an MX record so that your email system can start routing mail to Office 365.
  10. Verify routing and then stop email synchronization. After you verify that all email is being routed to Microsoft 365 or Office 365, you can delete the migration batch to stop the synchronization between your source email system and Microsoft 365 or Office 365.
  11. Send a welcome letter to users. Let your users know about Microsoft 365 or Office 365 and how to sign in to their new mailboxes.

IMAP MIGRATION TECH ENCYCLOPEDIA MICROSOFT EXCHANGE O365

TEST ENVIRONMENT

A test Outlook.com email account is created with emails for the tutorial

outlook email account

KEEP IN MIND

For this tutorial:

  • An office 365 subscription is bought that includes Exchange Online.
  • New domain (EX- abcd@com) is bought from internet registrar (EX- GoDaddy) and DNS records should be configured.

Link: Add DNS records to connect your domain

IMAP MIGRATION TECH ENCYCLOPEDIA MICROSOFT EXCHANGE O365

TUTORIAL

Before the migration begins, it is needed to enable two factor authentication.

For that log in to the Outlook.com email account

https://outlook.live.com/owa/

Visit Security Settings page

https://account.live.com/Proofs/Manage

Click Set up two-step verification

1 email security2 email security

Press Next to proceed with two-step verification process

3 email security

TWO FACTOR AUTHENTICATION : STEP 01

As the first, step make sure security info are up-to-date to receive necessary codes

TWO FACTOR AUTHENTICATION : STEP 02

The second step requires to configure the Microsoft Authenticator app for mobile phone

After pressing next in the previous screen and proceeding, you can download the Microsoft Authenticator app for your mobile phone. Else, you can go to Microsoft website to download the app.

4 email security

You need the access to a mobile device to proceed and download the Microsoft Authenticator app.

Click get the app

Screenshot_2020-08-19-12-04-54-78

Choose the correct store

  • Google Play – Android devices
  • App Store – Apple devices

Screenshot_2020-08-19-12-05-27-52

Install the Microsoft Authenticator App

Screenshot_2020-08-19-12-05-46-25

After installing click on the Microsoft Authenticator App icon to open the App

Screenshot_2020-08-19-12-07-22-28

After configuring the two-step verification properly, a request will be sent to the mobile phone to be approved when logging to the E-mail account

8 log in ater veriication

You also can make sure the account is protected by two-step verification by visiting the Security Settings

Go to the settings page

https://account.live.com/Proofs/Manage

7 turned on veriication

TWO FACTOR AUTHENTICATION : STEP 03

Third step provides the recovery code to recover the access to the account

5 email security code.JPG

TWO FACTOR AUTHENTICATION : STEP 04

In the fourth/ last step, create an app password. The app password is also needed to continue the migration process later on

Go to the settings page

https://account.live.com/Proofs/Manage

And, create a new App password

1 app password

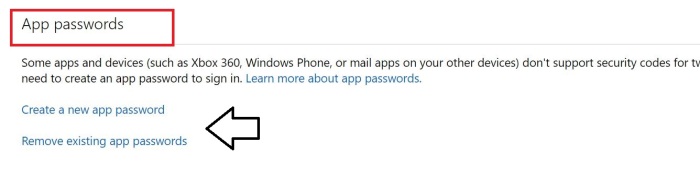
The new App password is displayed which can be used later on

2 app password

Login to office 365 subscription services using credentials to perform migration.

Go to office.com

https://www.office.com/

Sign in using credentials

Email migration outlook.com to office 365 1

Go to Microsoft Office 365 Admin Center

Email migration outlook.com to office 365 0365 2

Go to Setup

Email migration outlook.com to office 365 0365 3

In Data Migration select View from Migrate your user’s data

Email migration outlook.com to office 365 0365 4

Select View migration to view the options available

Email migration outlook.com to office 365 0365 5

Select Outlook as the data service

Email migration outlook.com to office 365 0365 6

Click Start migration after providing following details

  • Source email address
  • Previously generated app password

[Or you can generate a new App password here : https://account.live.com/proofs/AppPassword]

Email migration outlook.com to office 365 0365 7

The migration status will change as follows.

  • Starting
  • Queued
  • Syncing
  • Synced

After syncing is complete, Close the connection.

Email migration outlook.com to office 365 0365 status 8

It is important to make sure the IMAP e-mail migration is successful and the e-mail addresses are working fine by conducting tests.

USEFUL LINKS

Add DNS records to connect your domain

https://docs.microsoft.com/en-us/microsoft-365/admin/get-help-with-domains/create-dns-records-at-any-dns-hosting-provider?view=o365-worldwide

Get the name of your source email server by using Outlook on the web

https://docs.microsoft.com/en-us/exchange/mailbox-migration/migrating-imap-mailboxes/setting-up-your-imap-server-connection

IMAP migration in the Microsoft 365 admin center

https://docs.microsoft.com/en-us/exchange/mailbox-migration/migrating-imap-mailboxes/imap-migration-in-the-admin-center

Migration methods

https://docs.microsoft.com/en-US/exchange/mailbox-migration/office-365-migration-best-practices?WT.mc_id=365AdminCSH

Synchronize Users from Windows Server 2019 Active Directory to Azure AD

line5

This tutorial shows you how to migrate user accounts from Windows Server 2019 Active Directory to Azure Active Directory Domain Services via Azure Active Directory Connect.

KEEP IN MIND

  • A virtual Active Directory in Windows Server 2019 test environment was created using VMware Workstation to perform the migration process.
  • Please note that, for this tutorial, freely available Microsoft Azure subscription is used.
  • The tutorial is divided into 5 main sections
      1. Create a tenant
      2. Add the domain name
      3. Create a global user
      4. Download Azure AD Connect
      5. Install Azure AD Connect and initiate synchronization

POST CONFIGURATION TASKS

Windows Server 2019 Active Directory is configured to prepare for the synchronization process.

Link to create Active Directory in Windows Server 2019:

https://techencyclopedia.wordpress.com/2020/02/16/how-to-install-active-directory-in-windows-server-2019-step-by-step-guide/

Couple of test users are created in Active Directory for synchronization

test users

01 CREATE A TENANT

To make the project more organized, a new tenant is created to configure the Azure Active Directory users. A tenant represents an organization in Azure Active Directory.

Choose the Azure Active Directory resource from the Microsoft Azure Portal.

Alternatively, you can search from the search bar located at the top of the screen.

tenant create 1

Click the + Create a tenant to create a new tenant

tenant create 2

Configure the Basics tab

For the tenant type, Azure Active Directory is chosen

tenant create 3

Configure the Configuration tab

Provide the Organization name

Provide the Initial domain name (This will be changed later on)

Provide the Country or Region (The Datacenter location will be based on this input)

tenant create 4

Review and Create the tenant

After, reviewing the new tenant information, click create to finalize

tenant create 5

After creating the new tenant, switch from the default tenant to the new one.

Go to the Azure Active Directory Overview

Click on Switch tenant

tenant create 6

Switch to the new tenant

tenant create 7

Confirm that you are connected to the new tenant before proceeding forward.

tenant create 8

02 ADD THE DOMAIN NAME

The domain is added to the Azure Active Directory. This should be the same domain name that configured the user accounts in on premises Active Directory Domain Services.

Click on + Add Custom domain to add the domain

domain name 1

To verify the domain name there will be a delay since to propagate DNS records it will take up to 72 hours. However, please note that most of the times it will take less than 72 hours.

To complete the domain name verification process, create following 2 DNS records in the domain name registrar (GoDaddy)

  • TXT
  • MX

domain name 2

TXT record is added to the GoDaddy (add the MX record as well before clicking the verify button)

domain name 3 txt record

After verifying the domain name make it the primary domain name.

Click on the newly added verified domain name

domain name 4 after verfication

Click on the Make primary 

domain name 5 make domain name primary

03 CREATE A GLOBAL USER 

As for the next step, you have to create a user account in Azure Active Directory and provide the Global Administrator privileges. Global Administrator possess all the permissions to manage all aspects of Azure AD and Microsoft services that use Azure AD identities.

Go to users in Azure Active Directory

global user 1

Click on + New user to start creating a new user process

global user 2

Choose the Create user option

global user 3

Insert the details under Identity section

Add the User name and make sure the correct domain name is selected.

global user 4

Configure the password options

In this case, new password is given instead of allowing to generate a password

global user 5

Groups and roles section is configured

For the role, Global administrator is chosen from the directory roles menu

global user 6

After changing the role it will look like this

global user 7

Complete the rest of the configuration

Block sign in option should be ‘no’ and it is selected by default

After completing the user configuration click create to finalize

global user 8 final step

After the new global user is created using the credentials log back in to the Azure portal. You will have to change the given password and provide phone authentication details to continue. 

Enter the user name to sign in

log back 1

Enter the previously given Password

log back 2

Next screen will prompt you to Update your password

log back 3

After logging in authentication phone details should be given

log back 4

Now you are logged in as the newly created User with Global Administrator privileges

log back 5

Search for Azure Active Directory resource to make further configurations

log back 6

04 DOWNLOAD AZURE AD CONNECT

After logging back in as the global administrator, go to the Azure Active Directory and download Microsoft Azure Active Directory Connect.

Click on Azure AD Connect to proceed

Azure Ad sync 0

Click on Download Azure AD Connect to go to the Microsoft Download page

Azure Ad sync 1

Click on Download button to continue

Azure Ad sync 2 download

Read the system requirements and install instructions prior to installing the Azure Active Directory Connect. The System Requirements will provide the information of the supported Operating Systems.

Azure Ad sync 3 details

The System Requirements

Azure Ad sync 4 sys req

05 INSTALL AZURE AD CONNECT AND INITIATE SYNCHRONIZATION 

Azure AD Connect is installed in the on-premises Windows Server 2019 Active Directory Domain Controller to initiate the synchronization process.

Log in to Windows Server 2019 (Install and configure AD in Windows server 2019)

(Active Directory user should have Enterprise domain administrator privileges)

2019 AD 2 Azure-2020-07-28-22-46-07

Double click on downloaded Azure AD Connect setup file to install Azure AD Connect

2019 AD 2 Azure-2020-07-30-21-36-54

Agree to the license terms and privacy notice to continue with the instillation

2019 AD 2 Azure-2020-07-30-21-37-30

In this case, Express settings are used

2019 AD 2 Azure-2020-07-30-21-37-36

Enter the Azure AD global user credentials

2019 AD 2 Azure-2020-07-30-21-40-08

Browser window will prompt to sign in to the account using the password

2019 AD 2 Azure-2020-07-30-21-44-04

Complete the phone authentication process

2019 AD 2 Azure-2020-07-30-21-44-28

Enter the credentials to connect to the on-premises Active Directory

2019 AD 2 Azure-2020-07-30-21-45-33

Tick to start the synchronization process right away after completing the installation

2019 AD 2 Azure-2020-07-30-21-45-42

Sign in to Azure to check that on-premises Active Directory users are synchronized to the Azure Active Directory. 

Go to Azure Active Directory > All users

user sync

By default the sync process is scheduled to run every 30 minutes. You might want to use sync powershell commands to manually run the process.

Azure AD Connect sync: Scheduler

Read more at:

https://docs.microsoft.com/en-us/azure/active-directory/hybrid/how-to-connect-sync-feature-scheduler

The scheduler is by default run every 30 minutes. In some cases, you might want to run a sync cycle in between the scheduled cycles or you need to run a different type.

To see your current configuration settings, go to PowerShell and run

Get-ADSyncScheduler

If you need to manually run a sync cycle, then from PowerShell run

Start-ADSyncSyncCycle -PolicyType Delta

To initiate a full sync cycle, run

Start-ADSyncSyncCycle -PolicyType Initial

2019 AD Azure -2020-07-21-23-59-42.png

TROUBLESHOOTING

CANNOT DELETE USERS ACCOUNTS

If you get an error that can’t manage or remove objects that were synchronized through the Azure Active Directory Sync tool it can be two reasons.

This issue may occur if one or more of the following conditions are true:

  • The on-premises AD DS is no longer available. Therefore, you can’t manage or delete the object from the on-premises environment.
  • You deleted an object from the on-premises AD DS. However, the object wasn’t deleted from your cloud service organization. This is unexpected behavior.

Read more at following article

https://docs.microsoft.com/en-au/troubleshoot/azure/active-directory/cannot-manage-objects