VMware vSphere 7.0 Series
PART 01: How To Install and Configure VMware ESXi 7.0
PART 02: Install Virtual Machines Using ESXi Web Client
PART 03: Install vCSA 7.0 (vCenter Server Appliance)
KEEP IN MIND
- In this tutorial, VMware ESXi 7.0 is installed and configured using VMware workstation virtual environment in home lab.
- You may install VMware ESXi 7.0 in a physical server in corporate to vritualize the servers (Windows 2016/2019, Windows 8/10, Linux etc).
- In addition to that basic configurations are shown such as Hostname configuration and IP address configuration.
What is VMware ESXi Server?
VMware ESXi server is a baremetal hypervisor (without running an operating system) that can run Virtual Machines.
TUTORIAL
Download ESXi server 7.0
Download ESXi server 7.0 from VMware website (In this scenario, a free trial is downloaded which can be used for 60 days before getting expired)

Install ESXi server 7.0
Boot the downloaded image file and choose the standard installer

let the ESXi installer load


Press enter key to continue the ESXi 7.0 installation
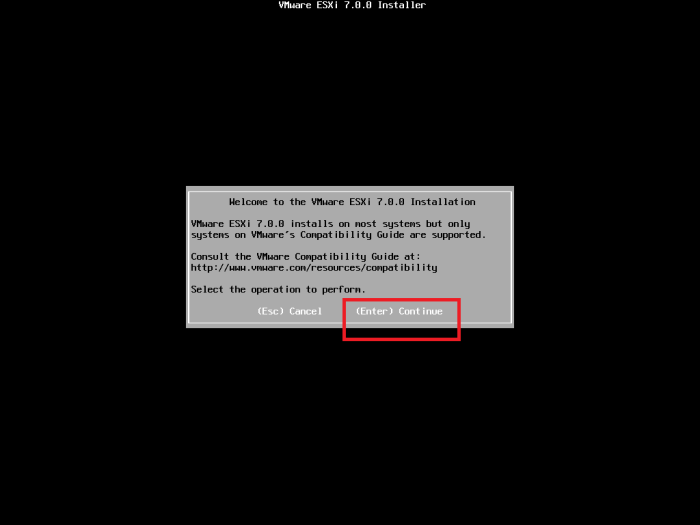
Accept the End User License Agreement to continue

Choose the hard disk to install ESXi server 7.0 and press Enter key
You can refresh using F5 key if the hard disks are not visible
And make sure to use IDE hard disk if necessary because for some reason SCSI was not visible in the configuration (refer Troubleshooting section for screenshots)

Enter a root password and confirm

Press F11 key to confirm the ESXi server 7.0 installation

Wait couple of minutes until the ESXi server 7.0 installation finish

Press Enter key to reboot after the installation

The ESXi server can be configured using function keys
192.168.1.25 – IP address given to manage the ESXi server
<F2> Customize System/ View logs
<F12> Shutdown /Restart

Basic Configuration
Change the IP address of the ESXi server 7.0
Press F2 key and enter the previously given root password

Configure the Management Network

Select the IPv4 configuration to change the IP address
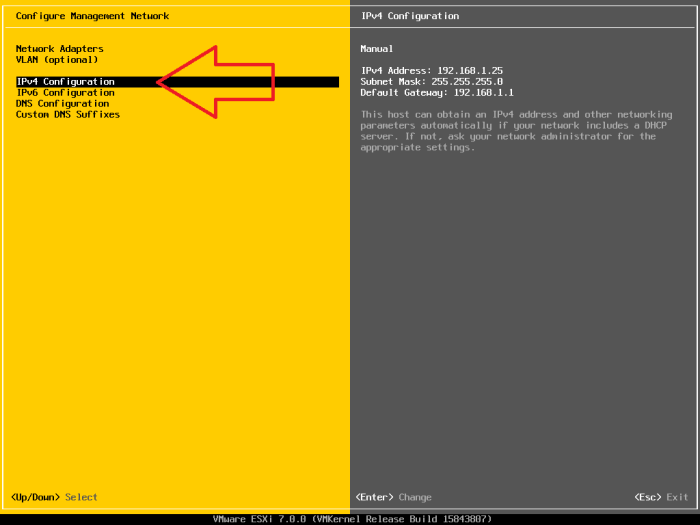
Give an IP address (static IP 192.168.1.50 is given)

Press ‘Y’ to confirm the IP change and restart the management network

The new IP change will look like this

Change the Hostname
To change the Hostname select the DNS configuration in the Configure Management Network menu

Give an appropriate Hostname

New Hostname will be visible like this

Log in using
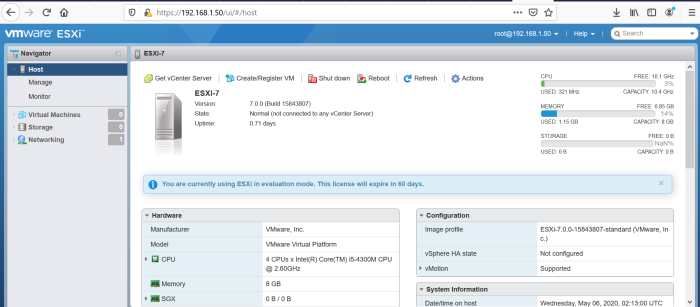
After the installation and configuration of ESXi server 7.0, you can visit the ESXi login screen using the management IP address and the root password from a remote computer.
Using this interface you can create and maintain virtual machines.

TROUBLESHOOTING
Hard disk not visible error
In VMware workstation, for the virtual matching, create an IDE hard disk instead of the default SCSI because for some reason SCSI was not visible in the configuration.

Network adapter not visible error
If you are installing the ESXi Server 7.0 in VMware workstation, you might encounter an error stating ‘No network adapters”. To resolve this, go to vmx file where the virtual machine is installed and make following changes.
ethernet0.virtualDev = "e1000"
TO
ethernet0.virtualDev = "vmxnet3"
There is an excellent article written by Andrea Mauro at: https://vinfrastructure.it/2020/04/installing-esxi-7-0-on-vmware-workstation/

For the not seen storage, it’s also possible to replace in the vmx file, the default scsi setting scsi0.virtualDev = “lsilogic” by “pvscsi”. It works with ESXi 7.0 on Workstation Pro 15.5.
LikeLike
Thank you for your sharing knowledge
LikeLike